Expert Hardwood Floor Installation & Refinishing

news and facts

Hardwood Floors Can Promote A Lovely Sense Of Flow..

When house shoppers open the front door they love to see all rooms on 1st floor linked together. So many homes have various flooring products for different rooms. How many times have you seen tile in the foyer and kitchen, carpet in the family room or den, and usually hardwood for the living and dining rooms? This gives a very choppy feel and compartmentalizes the rooms. I say rip it all up and start anew! Run a hardwood floor from left to right (or front to back) and see how things immediately open up! Every room can still have it’s own personality and the hardwood floor will be the trail taken from one ambience to the other. The random lengths and natural variation of the boards gives a warm and natural feel that tile/carpet/vinyl never will. Next time a prospective buyer is turned off by the choppy feel of the layout on an otherwise promising listing, let them know your hardwood flooring contractor can open things up by laying hardwood flooring down.

Hardwood Floors Can Promote A Lovely Sense Of Flow.. Read More »

hardwood flooring installer

Hardwood Flooring Mistakes To Look Out For!

You probably already know this but not every hardwood flooring company can deliver such exceptional work as we can. Things can happen on a job (though, they don’t on ours 😉 and sometimes there are blemishes to address. Installation and especially refinishing of hardwood floors requires an eye for detail and a steady hand. When mistakes are made, no one is happy. Here are some hardwood flooring errors and why they happen…(not to us, I’m saying…the other guys..), Installation – * Gaps in-between boards Caused by not checking moisture content of subfloor and floor. Could also be caused by using an insufficient amount of nails or not spacing the nails correctly. * Buckled boards Could also be cause by moisture but also by not leaving enough of a gap between floor and wall to allow for expansion and contraction. Also caused by installing over an unlevel subfloor. * Uneven pattern Caused by not setting a line square with the rest of the house. * Chips and cracks and on boards Caused by using wrong gauge for nail-gun, faulty compressor or using wrong nail size. Refinishing – * Chatter marks (looks like ripples in the wood) Almost always related to the sanding machine being in need of repair. * Sanding marks Caused by improper technique. Can show as cuts in the wood, swirl marks or scratches. * Blotchy/Uneven stain Caused by not water-popping the hardwood floor prior to staining. Also caused by poor technique used when applying stain. Another factor could be not following the correct grit schedule. * Rough finish Caused by not eliminating all residual dust/debris before applying urethane, which then gets trapped in the finish. A professional hardwood flooring company (like us) has a process to be followed that ensures these mistakes never happen. Getting it done right the 1st time is our priority because we know mistakes can be costly. If you’ve been on a hardwood flooring job and have seen any of the above, run away fast and be glad knowing your go-to hardwood flooring company (us) would never do such things.

Hardwood Flooring Mistakes To Look Out For! Read More »

Man installing wood flooring in home.

Hardwood Floor Installation Can Be An Exciting Process..

In a way, installing a hardwood floor is like piecing together a puzzle. At first you have a bunch of random pieces, but once joined together, they reveal a work of art. Today I will go over the process and how it’s done while touching on important details the guys look for to ensure the installation is done professionally. The absolute first thing the installers look at is the quality of the subfloor. If installing hardwood flooring over a plywood subfloor, the guys confirm that the subfloor is level and dry. Nailing a solid hardwood floor over a faulty subfloor will only create problems with the new floor. So, a moisture-meter test is done and they look for any peaks and valleys in the plywood that could cause unevenness with the hardwood floor. Once that is done the guys will “set a line”. This line is the center line that every house is built around. This line is the guide the installers will use to align the hardwood floor with the other lines in the house (walls, trim, etc.) so everything looks symmetrical. At that point the installers will then open up the cartons of hardwood flooring and begin to lay out the boards. This is where they will organize the various lengths to ensure variation. Last thing anyone wants to see is a room or area of the house with a bunch of short boards grouped together. Once the boards are laid out and the lengths are varied, it is then time to nail them down! A pneumatic nail gun is used to secure the floor to the subfloor, spacing the nails 6″ apart. It’s important that this distance of 6″ between the nails is followed to avoid incurring problems with the floor. A gap of about 1/4″ is left between the floor and the wall or baseboard. This gives the hardwood floor enough room to expand as it will during the warmer seasons. Defective boards are discarded. Many times the installers will find ugly boards as well as boards that contain imperfections in the milling. This is why a 6% waste factor is used when placing the order. Once the floor has been installed they guys will then go around and look for any imperfections to address. Many times they will find boards that have split or cracked in certain places. This can happen when the nail is being shot through the tongue and groove. Those boards are replaced. They will then wipe down the floor with paint thinner or other cleaners so to remove and marks or excess adhesive. Many times they will fill any sizable gaps with putty to keep the floor looking tight. That’s pretty much the gist of it. Sounds pretty easy, right? Actually, it’s a tough job. Not only is it hard on the back and knees but it also works the brain as you constantly need to be paying attention to how things are transpiring so to avoid having to do repairs or, god-forbid, take up and replace a large section of boards you just installed. So let’s give my guys some credit, they work hard and smart and always get the job done right the 1st time! Try us out next time you or your clients have a hardwood floor to be installed.

Hardwood Floor Installation Can Be An Exciting Process.. Read More »

hardwood floors

Before You Do Your Hardwood Floors, Consider These Things!

Before you address your hardwood floors there are several things to consider before doing so. A major hardwood flooring project can bring big change to the look and feel of a home. And with so many different species of wood available, plus all the different stain colors to choose from, picking the right floor can be a big decision. Beyond that, once a floor is down or refinished, the end result is what home-owners will be looking at for the next 10-15 years. This means that picking a hardwood floor should not be a decision made in haste! Meanwhile, here are some important points to consider which may even help steer your clients to the best hardwood floor for their particular house! Kitchen Cabinets –Before having a new hardwood floor installed or an existing one refinished, it’s important to consider the color of the kitchen cabinets lest they clash with hardwood floors. I suppose it helps that most kitchen cabinets today are white, which is easy to work with when picking a stain color for your hardwood floor. But for every other situation out there, best to make sure the hardwood floors and kitchen cabinets compliment each other. Beyond color, have your clients consider the grain pattern of the hardwood floor and see how well it works with the wood grain in the cabinets, if they are not painted. Trim and Moldings –Hardwood floors tend to tie together different features of a house. This is why the hardwood floors should look good up against any trim like door casings and baseboards. Again, most of the time these moldings are white, but in the event they are not and have been stained, best to go with a stain color that works best with the trim. The pic below shows what to avoid! Staircases –Considering the fact that the main staircase is one of the 1st things anyone sees when coming through the front door, very important to go with a hardwood floor that will work well with the stair parts. Ideally it’s best to have any handrails and posts stained to match the floors but this can be a very costly project. If that’s not an option, a home owner can have the hardwood floors match the color of the stair parts or choose a stain that works well with the existing color of the stair parts. Of course the # 1 consideration should be – who’s going to do the job? Consider this, we’ve been at it for over 20 years and will always look to provide a comprehensive consultation when visiting a prospective customer’s home. We will make sure your clients get the hardwood floor that works best with their house and their budget. So, let them know!

Before You Do Your Hardwood Floors, Consider These Things! Read More »

LVP Flooring Is Very Popular Now, Here Is Why!

Check your eyes because it’s not hardwood at all, it’s an LVP floor. Luxury Vinyl Plank flooring has been around for a while now and continues to gain in popularity. It is waterproof and can stand up to heavy traffic. These floors are ideal for basement installs as they can be installed directly onto a concrete slab and are not affected by humidity/moisture. Truth is, home-owners are opting to install LVP flooring throughout the home in place of more costly hardwood floors. LVP floors are manufactured to mimic the look of real hardwood and feature all of the natural characteristics you’d find in real wood like variation, knots, mineral streak, etc. Unlike sheet vinyl flooring, LVP comes in individual planks which provides a seamless, flowing look when installed. One big selling point with LVP is the ease of install. These floors can be installed directly on top of existing vinyl, linoleum, tile and even hardwood flooring. However, it’s imperative that the existing floor be perfectly level otherwise there will be soft spots. Best to stick with at least a 6 mm thickness when picking an LVP floor. Anything thinner than that could be problematic. It’s also prudent to go with one that has an underlayment attached to the back for more cushion underfoot and some noise cancellation.

LVP Flooring Is Very Popular Now, Here Is Why! Read More »

hardwood flooring patterns

Thrillingly Unique Patterns For Hardwood Flooring Installation

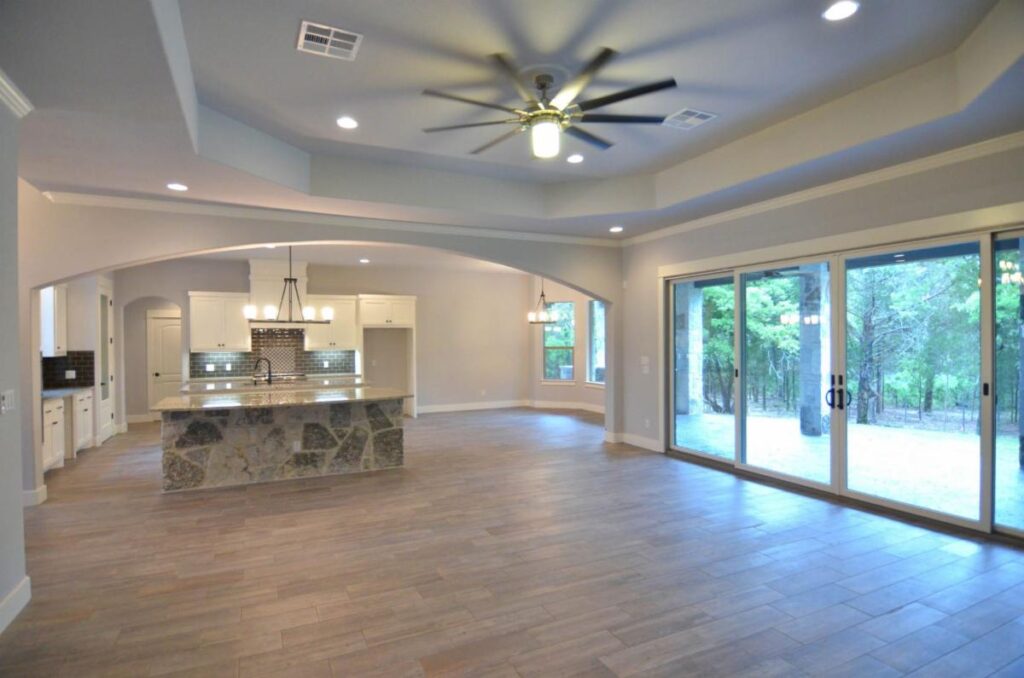
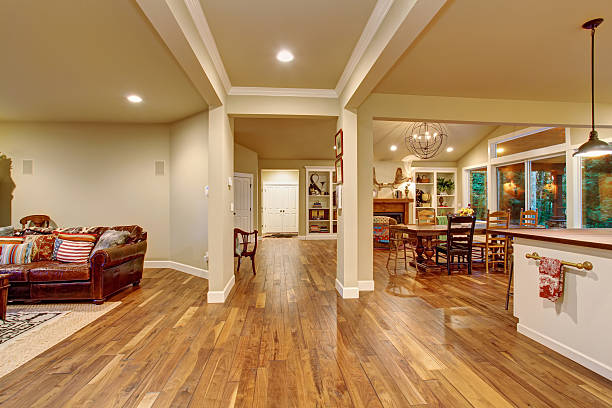
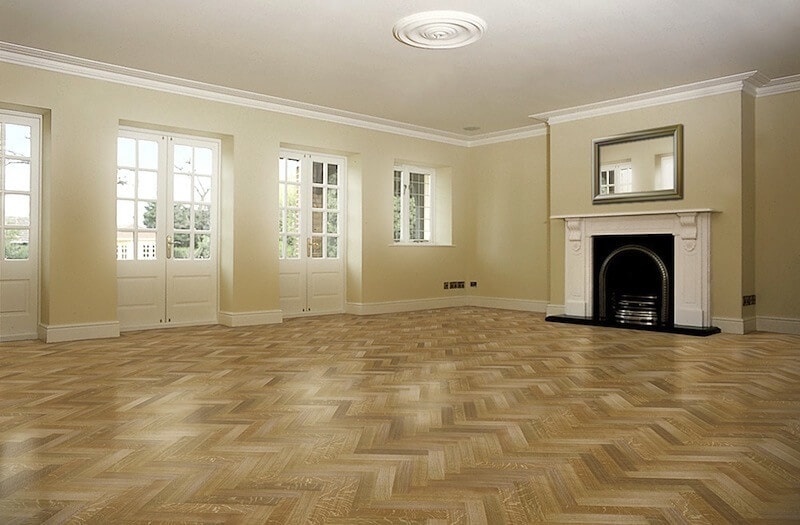
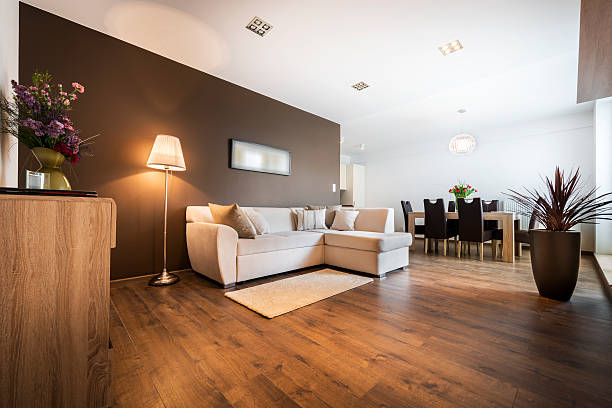
The world of hardwood flooring is full of options. There are different species to choose from, countless different manufacturers, color options, width of boards, solid or engineered, etc. You even have options as to how a hardwood floor can be laid. Hardwood flooring traditionally comes in boards of random lengths. Once installed, the floor presents a type of pattern. Some homeowners like to get more creative and go with a more artistic type of pattern that will compliment the rooms or the existing decor. I’ll go over some of the patterns in case your clients would like to spice things up a bit and really make their home stand out… 45 Degree Angle (Pic above) – 45-degree flooring creates a sense of movement and fluidity, offering a unique aesthetic that can transform the look and feel of a room or the entire floor of a home. This angle can also be a clever tool in interior design to guide the eye and create a sense of flow through different areas of a home. It could be used in a single room, giving that room a sense of uniqueness, or it can interestingly tie rooms together throughout an area of the home. Random Width (Pic below) – We’ve done countless jobs in a random-width pattern and in my opinion it gives the floor a very custom look. The most common pattern is 3 1/4″ and 5″ planks but depending on the size of the rooms one could go even wider. A random-width pattern does a good job of hiding the bevels of a hardwood floor, giving it a more seamless look. It certainly works for a more rustic approach but can fit in with a modern look as well. Herringbone – This is a classic design that actually dates back to the Romans! Besides bring much elegance and class, the main advantage of herringbone is that it makes small spaces look large. I personally find it to be a very elegant look, a real eye-catcher! Because it doesn’t have any angled joints, you can get a herringbone floor with all types of hardwood flooring and some click-together options like laminate and LVP. It’s not the easiest type of floor to install, by the way. Best to trust pros like us that can get it done right. Chevron – Note that Chevron is different from Herringbone, but to the untrained eye, they can be easy to confuse. The easiest way to tell the difference is to note that herringbone is made up of 90-degree angles, while chevron wood floor patterns are made up of 45-degree angles. We did a job for a very particular home owner in North Wales, it was about 800 sqft of exotic hardwood installed in a Chevron pattern. That job was a doozy! But, the end-result turned out beautiful! Check it out… Borders – Hardwood flooring with a border is a classic look that can do a good job of framing a room. It’s best used in rooms that are for the most part a perfect square. Usually, the boarder itself is of a different color than the main floor. It can also give a sense of flow if installed throughout a home’s entire floor. Honestly, we used to get more requests than we do so it may be going out of style but can always work if done tastefully. We’ve done some wild jobs throughout the years. Once we were involved in a job where the owner installed various species of hardwood in various widths..and it was all reclaimed wood! Lost my pics of that job but it might be for the best. I got dizzy just looking down at it. Course it was in Philly by the art museum so…

Thrillingly Unique Patterns For Hardwood Flooring Installation Read More »

hardwood floors

How Long Does It Take To Install/Refinish Your Hardwood Floors?

“Time is of the essence”…a statement so important that it’s written on a real estate contract, as you all know. Truth is, that statement holds true even after the real estate deal has been consummated. After the contracts have been signed there will be more work to do, the work that will make the house look like home. These big renovations have a lot of moving parts and can be a lot to coordinate. There is always a timeline involved which makes it essential for all the trades to adhere to the timeline they give the home owner. So how long is is going to take to do the hardwood floors? No one wants the other contractors messing up a brand new hardwood floor or newly refinished hardwood floor so we should be in last. That puts a bit of pressure on us to stick to a firm timeline as many times furniture is on it’s way and people are eager to move in to their new homes. The way we handle this pressure is by working efficiently and maintaining communication with the home owners so there are no unnecessary delays. We stick with a system that keeps us on point and ensures that we work in a timely fashion while still delivering exceptional results. So how long to do a hardwood floor? An installation from 600-1200 sqft would take 2-3 days to complete. Figure 3 days if there is an existing floor to demo. Installs from 1200-2000 sqft would take 3-4 days to complete. Anything larger would most likely be 4-5 days. One factor that can extend these timelines is whether or not there is furniture in the house. Refinishing hardwood floors takes longer to complete as the staining and finishing both require time to dry. If a hardwood floor refinishing project is within 600-1200 sqft and a stain is desired, the project will take 3 days to complete. One day to sand and stain, two days to apply the urethane finish. Jobs 1200 sqft and up will take 4-5 days to complete. Again, these timelines would increase if there is furniture, existing flooring to remove or repairs. Many times in the summer months on very humid days the stain does not always dry in time to coat the floors with finish on the next day, thus causing a delay. The same can happen with the urethane finish. Now, there are finishes like acrylic and Bona that dry much faster and would result in being able to complete the work sooner. With those finishes, a 3 day job can be completed in 2 under ideal conditions.

How Long Does It Take To Install/Refinish Your Hardwood Floors? Read More »

Man installing wood flooring in home.

All the Little But Important Details That Go Along With Your Hardwood Flooring.

I’ve always wondered if people would be more adventurous with their floors if they knew all the options available to them. Like most of you, I’ve seen countless homes and have also watched tends come and go. The majority of my customer want a floor that will work well with their house and furniture. Most home-owners are presented the same ideas and same kinds of floors most hardwood flooring contractors or general contractors recommend. Again, usually they are going by what the customer is describing as their ideal floor. I have the feeling that a lot of home-owners would be more excited about their hardwood floors if they knew how to make them really personalized and unique. To be clear, I’m not talking about high-cost hardwood flooring nor exotic species of wood that nobody else or can afford. I’m talking about little details and differences that are available to home-owners who would like to add personal touches to their hardwood floors. Here are a couple of ideas that won’t break the bank but can make a hardwood floor look extraordinary: Metal Transitions and Borders These can add a very sophisticated touch to any hardwood flooring job. The metal inserts could be used as a border around the perimeter of a room or as transition pieces at doorways between he hardwood floor and another type of hard surface floor. The metal is available indifferent colors that can pick up from hues in the wood. The contrast between wood and metal gives a very rustic-modern feel and can work well in just about any home. Random Width Boards I’m surprised that more people don’t go with random widths when installing a new hardwood floor. Even if you’re going with a run of the mill prefinished hardwood you could always make it more interesting by mixing up the size of the boards. You could do 3 1/4″ next to a 5″. If you’re doing site-finished flooring you could do 3 1/4″, 4″ and 5″ or go even wider than that depending on what would look good in the rooms. Either way, I think random width flooring gives a floor a very custom look as it’s just not all that common out there. Stone Trim and Transitions Much like metal, stone can make for a very sophisticated and elegant addition to a hardwood flooring job. You can find stone products that have similar grain patterns to the wood floor as well as complimenting it tone-wise. It probably would be expensive to do the whole house, but a mud-room or other specialty/utility room could get a stone base to match or compliment the wood floor. Lots of possibilities, just need a little vision.

All the Little But Important Details That Go Along With Your Hardwood Flooring. Read More »

Info On The Two Different Types Of Oak Hardwood Flooring

By far the two most sought after species of hardwood flooring are Red & White Oak. This brings up a question – what are the differences between the two? One of the most noticeable differences between RO and WO flooring lies in their color variations. WO flooring displays hues of medium brown and tan, while RO boasts tints and subtleties of red and pink. Both types of oak flooring accept stains well, but their staining capabilities differ. RO tends to turn a more distinct reddish shade when stained. WO, on the other hand, generally darkens to a brown hue. Despite their initial difference in color, when stain is applied to them that difference is diminished. The other factor that can visibly distinguish one flooring from another is the grain pattern of the wood.  While both are obviously oak, there is a definite difference between the look of WO and RO based on the graining. WO has a tighter, more consistent grain pattern while RO has a more wavy and varied grain pattern. The Janka scale is a measure of the hardness of wood and is utilized to compare the hardness of different species of wood. WO has a hardness rating of 1360, while RO has a rating of 1290, making WO generally considered harder than RO. This difference in hardness translates to a higher resistance to wear and tear for WO flooring, contributing to its durability. Mainly, this hardness difference helps combat against dents and dings in your hardwood flooring. Both RO and WO are very durable woods. Some might argue that the inherent hardness and density of WO makes it slightly more stable and durable compared to RO for wood flooring, but both types of hardwood flooring will work well. When it comes to staining RO vs. WO, both kinds of wood take stain easily. However, stain colors in lighter white and gray are quite popular today and WO is better suited to these hues. However, when it comes to using a medium to dark color, RO vs WO staining will look virtually the same. However, in my opinion, WO is the better fit for the chocolatey/expresso stain so many request for a stain color. That type of stain comes out much richer on WO. Being that both are quality hardwoods, choosing between RO and WO is a matter of preference and budget. Both offer the beauty that only nature can provide. That said, WO offers more advantages with slightly better strength and durability. Even with WO being a little pricier, homeowners are happy to pay the extra $ in order to mute the pinkish undertones found in RO.

Info On The Two Different Types Of Oak Hardwood Flooring Read More »

Hardwood Flooring Putty Can Be Very Helpful..

There are a lot of hardwood flooring companies out there but what we do differently is pay special attention to prep and finish work. A lot of guys/gals can throw down a hardwood floor or run a sander and brush some stain on but it’s the attention to detail that makes us stand apart from the others. Prep work is all about identifying certain conditions, either with the product or the jobsite, that could compromise the quality of the job. As I’ve mentioned before, these include ensuring the subfloor is dry and level, checking for any defects in the hardwood flooring and looking for any hazards that could cause problems down the road.  Then there are techniques that can really bring the “Wow” factor. On site-finished jobs, we apply wood putty to fill in any gaps or holes so that once the hardwood floor is sanded, stained and finished the floor will look tight and consistent. Applying the putty prior to staining/finishing ensures the putty will blend in with the wood as it will take the stain. On prefinished hardwood flooring installs, we pay special attention to the milling of the hardwood itself. If not milled precisely there will be unsightly gaps between boards which will need to be filled. Though there are wood puttys that are made to match many popular hardwood flooring stains, the less wood putty we have to use the better the floor will look. Another way we pay close attention to detail is a technique called board racking. Being that most hardwood flooring comes in random lengths, it is important to organize and arrange the boards in a way so to ensure in no area will there be a collection of boards of the same size. You can’t just open up a carton/bundle one at a time and start installing. We open all the cartons/bundles in a room and rack the boards so there is variation in lengths which will give a sense of flow and not look choppy. The trim installed after the floor is down is what really brings it all together and can make or break a job. When installing shoe/quarter round molding along the perimeter, we are careful to putty and caulk all nail holes and gaps which gives the trim a real tight look that complements the floor. It also takes a keen eye to sit transition pieces down nice and flush so they don’t look crooked or god forbid become a tripping hazard.  On site-finishing and refinishing jobs we are careful with how we apply the finish when we are finished. I’m not even finished, let me tell you how! Firstly, we control the area so there is no dust travel while applying the urethane. Nothing worse than doing an excellent job at sanding and staining only to have dust embedded in the finish at the end of the job. We are also careful as to which applicators we use as some perform better than others. Even the application of the urethane takes some technique. It takes a smooth hand and a sharp eye to make sure the coverage is even so to avoid any blemishes. Again paying special attention to these and other details is what makes us outshine the competition. If your clients aren’t raving up and down about when we’re finished then shame on us. But, with our special attention to the start and finish, we are confident in knowing the end result will be another job well done.

Hardwood Flooring Putty Can Be Very Helpful.. Read More »